
In this article we are going to discussed the best way to notify to a web application the connection of a USB key on the PC.
After many hours of research, the top two solutions I found were:
- Use Chrome and its new USB API
- Write a Windows service running on the user PC and a web client.
The client on start, connects to server and wait for a USB key to be plugged.
If you want to visit the example repository click here.
Indice dei contenuti:
- SOLUTION 1: Chrome USB API
- SOLUTION 2: Client and Service
- Strategies Comparison
- SOLUTION 2: Big Picture
- Conclusions
SOLUTION 1: Chrome USB API
This is a new technology, recently added to Google Chrome, that makes it possible for the browser to communicate with USB devices.
Of course, choosing this strategy has cons. It only works on Chrome, and therefore it is not cross-browser. The user must provide specific consent to the browser to allow communication with the USB devices. The APIs are currently searchable through the library only using javascript, so there is no integration with C#.
The actions available by the API still seem to be scarse and designed mostly for file transfer in a classic use of a USB stick. This makes difficult to develop software in complex USB device scenarios, such as a fiscal code reader or a security card reader.
It could be a great choice in simple scenarios, such as USB sticks.
PROS:
- Simple for USB sticks
CONS:
- No cross-browser
- Use must provide consents
- Avaiable only for Javascript
- API lacks core funcionalities
- Service and client
SOLUTION 2: Client and Service
The alternative is to write a Windows service, to be installed on the PC, and a web client which connects to the service and receives notifications when a USB stick is plugged. The downside of this method is that the Windows service has to be installed on the client PC together with all the related problems regarding deployments and updates. (This way has the downside that it needs to have the Windows service installed on the client PC and all the related problems regarding deployments and updates.)
On the other hand, the service allows you to interact with the Windows management by exploiting all .NET and C# power. Thus, making the code more easily adaptable to the environment, using the Windows service you can work with complex USB devices such as identity card readers or security keys.
The main cons of this solution is its complexity. The presence of two actors, the web client and the Windows service, makes it a more complex strategy than the previous one.
PROS:
- Easy adaptable to environment
- All components are part of .NET
CONS:
- Difficult install and updates
- Complexity
Strategies Comparison
The two strategies above have pro and cons, the main cons for both solutions are that the user has to enable Chrome USB access or has to install the service, in general a user has to make an action to PC.
Certainly, giving permissions to the browser is easier than installing a windows service but in both cases the user has to made an interaction with the PC.
About code complexity, service and client is more complicated than Chrome USB API but the first solution presents countless advantages in terms of flexibility. In fact, the service can manage many USB device types, making it easily adaptable to environment.
The Chrome USB API presents big cons, it makes difficult or impossible to develop a code for particular USB devices, only this restriction makes the solution usable for narrow scenarios. As said before, it works only with USB sticks and it is optimized for file transfer.
The Client+Server strategy is more flexible and can adapt better to various USB devices, for this reasons the second solution is better than the first.
To conclude, we decided to use the client+service strategy because it is the most flexible and in any case its complexity is not much higher than the other solution.
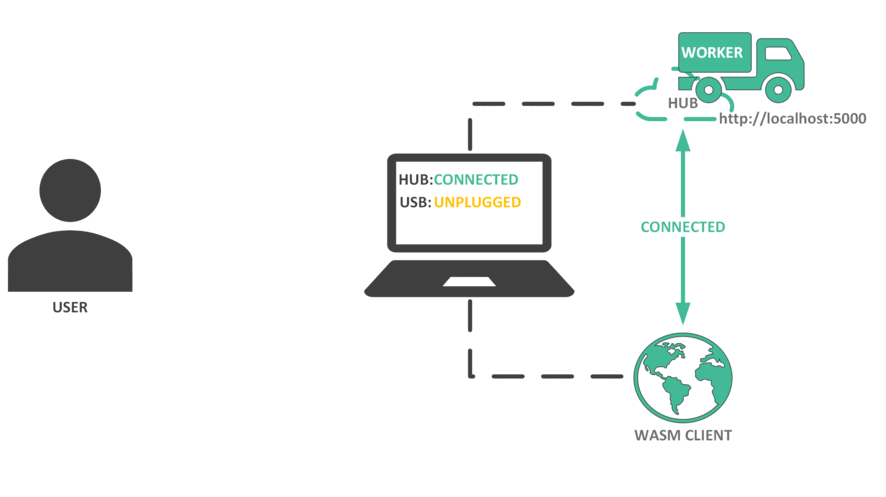
SOLUTION 2: Big Picture
The solution consists of two projects: a Worker Project that is a windows service installed on local PC and a Client Project that consists of a WASM Blazor client that runs on local PC browser.
Client
When an user navigates to http://localhost:6001 the client attempts to connect to the SignalR worker hub.
If the worker is not yet running then the client will retry the connection every 5 seconds and the homepage will display the hub connection status as disconnected.
If the worker is running, then the client will connect to worker’s SignalR hub and update the home page status as connected and will wait for pushes from the worker
Worker
Its purpose is to spy the windows management system by regularly making WQL (SQL like) queries. When the USB stick is plugged or unplugged it will push to the client through SignalR Hub (on http://localhost:5000).
Complete Life Cycle
The application conceptual life cycle is described in the following steps:
- User navigate by browser to https://host.my
- The web page try to connect to local SignalR hub but it is not preset
- The web page show the status of hub connection to DISCONNECTED and the usb status to UNPLUGGED
- The web page wait 5 seconds and retry to connect to SignalR hub forever
- The user install the windows service
- When the service is installed the client connected to it and the hub status is updated to CONNECTED
- The user plug a USB stick on the PC
- The service detect USB key and via SignalR push the client
- The client update the web page to show usb status to PLUGGED
- The user unplug the USB stick by the PC
- The service detect USB key is unplugged and via SignalR push the client
- The web page show USB status to UNPLUGGED

Bootstrapped Ecosystem
When the ecosystem is bootstrapped, the client is connected to worker SignalR hub and waits for worker push USB stick is plugged or unplugged. The below image shows the mechanism.
Tutorial
To reproduce this demo please follow the following instructions.
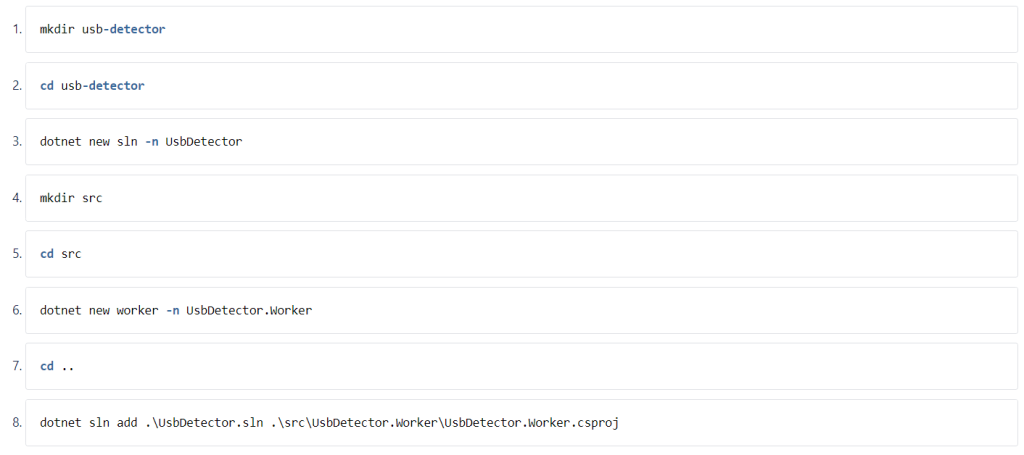
Create New Worker Project
To create the project using terminal commands, execute these instructions step by step.
Add USB Watchers to Worker
To make worker able to recognize when an USB is present add the following code:
1. Remove inherit BackgroundService class from Worker class
2. Remove virtual method ExecuteAsync
3. Implement IHostedService interface
4. Implement missing interface members StartAsync and StopAsync, for the moment they can throw NotImplementedException
5. Add watcher that fire when InsertQuery is satisfied
private const string InsertQuery = @"SELECT * FROM __InstanceCreationEvent WITHIN 2 WHERE TargetInstance ISA 'Win32_USBHub'";
private readonly ManagementEventWatcher _insertWatcher = new(new WqlEventQuery(InsertQuery))
6. In the worker constructor we need to register what we want to do when the watcher is fired, but for now we can just log on to console
public Worker()
{
   _insertWatcher.EventArrived += (sender, args) => Console.WriteLine("UsbInserted");
}
7. Now we need to start and stop the watcher, to do this modify “`StartAsync“` and “`StopAsync“` worker methods
public Task StartAsync(CancellationToken cancellationToken)
{
   _insertWatcher.Start();
   return Task.CompletedTask;
}

public Task StopAsync(CancellationToken cancellationToken)
{
   _insertWatcher.Stop();
   return Task.CompletedTask;
}
8. And finally we need to dispose the watcher when the worker is shutdown, thus implement IDisposable interface and implement it
public class Worker : IHostedService, IDisposable
public void Dispose() => _insertWatcher.Dispose();
9. Now if we run the worker and try to plug and unplug an USB stick from the PC we should see “Usb Inserted” message in the console. To run worker using terminal, go inside the worker’s project folder and type
dotnet runAdd USB Detector
Now we are going to add the class that manage what happen when an USB is plugged:
1. Create a folder with name Abstract
2. Inside the folder add IUsbDetector interface
public interface IUsbDetector
{
   Task OnInserted(object sender, EventArrivedEventArgs e);
}
3. Create a folder named Detectors
4. Inside the Detectors folder add a new class named UsbDetector and that implements IUsbDetector
public class UsbDetector : IUsbDetector5. Add a private const searcher WQL query
private const string SearchQuery = @"SELECT * FROM Win32_DiskDrive WHERE InterfaceType='USB'";6. Add the following code in OnInserted method
public async Task OnInserted(object sender, EventArrivedEventArgs e)
{
   using var searcher = new ManagementObjectSearcher(SearchQuery);
   foreach (var currentObject in searcher.Get())
   {
      var management = new ManagementObject("Win32_PhysicalMedia.Tag='" + currentObject["DeviceID"] + "'");
      var serialNumber = $"{management["SerialNumber"]}";

           Console.WriteLine($"{serialNumber} USB inserted");
   }
}
7. Now we have to register the above service in Dependency Injection (DI), go to the Program class and add the following line under “`ConfigureServices“` extension method
.ConfigureServices(services =>
{
   services.AddHostedService<Worker>();
   services.AddScoped<IUsbDetector, Detector>();
}
Warning! Use the following using instruction:
using Detector = UsbDetector.Worker.Detectors.UsbDetector;8. At this point we have finish the activity on UsbDetector class and we update the worker class to use new code
Update Worker
Updating the worker class to use above service.
1. First we inject IServiceProvider inside the worker’s constructor in order to retrieve a new instance of the detector every time an event its fired, in fact the worker has a singleton instance life time, so we have to access the ServiceProvider directly
public Worker(IServiceProvider provider)
{
   ...
}
2. Change EventArrived registration inside worker’s constructor:
_insertWatcher.EventArrived += (sender, args) =>
{
   using var scope = provider.CreateScope();

   var eventsService = scope
                       .ServiceProvider
                       .GetRequiredService<IUsbDetector>();

   eventsService.OnInserted(sender, args);
};
Now if we run the worker and try to plug and unplug the USB stick from the PC we shall see the message “`{SERIAL_NUMBER} USB inserted“` in console.
Add SignalR HUB
Now we need to add a SignalR Hub were the client can connect to the worker. To do this follow the next steps:
1. Add missing nuget package
dotnet add package Microsoft.AspNetCore.SignalR --version 1.1.02. Add new interface called IUsbHub inside Abstract folder
3. Create a folder called Hubs and inside it create a new class called UsbHub,this class has to inherits from the SignalR abstract class Hub<T>
public class UsbHub : Hub<IUsbHub> {}4. Now we have to expose our hub endpoint, but first to proceed we have to change projects sdk, to do this, edit project worker file and change the following line
<Project Sdk="Microsoft.NET.Sdk.Worker">with:
<Project Sdk="Microsoft.NET.Sdk.Web">5. After that we can go to the Program class and add the endpoint to the app builder
 .ConfigureWebHostDefaults(webBuilder => webBuilder.Configure(app =>
   {
       app.UseRouting();
       app.UseEndpoints(endpoints =>
       {
           endpoints.MapHub<UsbHub>("/usbhub");
       });
   }))
   .Build();
6. For now we end with worker service, at this point it is not runnable configuration. We continue with writing a WASM client.
Create WASM Blazor Client
The next step is to create a new Blazor WASM project. To do this, open a terminal, go inside src folder located inside us-detector solution folder, and run the following commands:
dotnet new blazorwasm -n UsbDetector,Clientcd ..dotnet sln add .\UsbDetector.sln .\src\UsbDetector.Client\UsbDetector.Client.csprojAdd SignalR Client
Now we have to add the SignalR client to connect with the SignalR worker hub, let’s start:
1. Add SignalR Package
dotnet add package Microsoft.AspNetCore.SignalR.Client --version 6.0.02. In _import.razor file import, add
@using Microsoft.AspNetCore.SignalR.Client3. Add @Code directive in Index.razor page and override OnInitializedAsync method
@code
{
   protected override async Task OnInitializedAsync()
   {
       await StartHubConnection();
   }

   private async Task StartHubConnection()
   {
       throw new NotImplementedException();
   }
}
4. Inject NavigationManager
  @code
  {
     @inject NavigationManager _navigationManager

     ...
  }
5. Create a nullable variable called _hubConnection of type HubConnection?
   @code
   {
      private HubConnection? _hubConnection;

      ...
   }
6. Add the following property
private bool Connected => _hubConnection?.State == HubConnectionState.Connected;7. Implement the StartHubConnection method
   private async Task StartHubConnection()
   {
      _hubConnection = new HubConnectionBuilder()
         .WithUrl(_navigationManager.ToAbsoluteUri("http://localhost:5000/usbhub"))
         .WithAutomaticReconnect()
         .Build();

      _hubConnection.On<string>("Connect", serialNumber =>
      {
         _serialNumber = serialNumber;
         StateHasChanged();
      });

      await _hubConnection.StartAsync();

      if (Connected) Console.WriteLine("connection started");
    }
8. Implement the IAsyncDispose interface
@implements IAsyncDisposable9. Implement missing DisposeAsync method
public async ValueTask DisposeAsync()
   {
      if(_hub.connection is not null) await _hubConnection.DisposeAsync;
   }
10. Change app http url to avoid conflicts with the worker service, in Properties folder in launchSettings.josn file change the port from 5001 to 6001
json
    "UsbDetector.Client": {
      "commandName": "Project",
      "dotnetRunMessages": true,
      "launchBrowser": true,
      "inspectUri": "{wsProtocol}://{url.hostname}:{url.port}/_framework/debug/ws-proxy?browser={browserInspectUri}",
      "applicationUrl": "https://localhost:7263;http://localhost:6001",
      "environmentVariables": {
        "ASPNETCORE_ENVIRONMENT": "Development"
      }
    }
11. If now we start the app we received CORS error, to manage this we have to enable CORS on worker
Enable CORS
Go to Program class in worker project to add CORS support
1. In ConfigureServices add the following
services.AddCors();2. In ConfigureWebHostDefaults add at the start
   app.UseCors(policy => {
      policy.AllowAnyHeader();
      policy.AllowAnyMethod();
      policy.AllowAnyOrigin();
   });
3. Run the following commands on Terminal from solution folder
cd src\UsbDetector.Workerdotnet runcd ..cd UsbDetector.Clientdotnet run4. The client start and open window browser that show the succeed connection between client and worker. You can also open browser console to see “connection started” message
React to Worker Push
1. Now we have to add the piece of code that manages when worker push that the USB stick is inserted.
Prepare a variable where store serial number
private string? _serialNumber;2. In StartHubConnection in Index.razor page, we added _hubConnection.On extension method, change the method
   private async Task TryOpenSignalRConnection()
   {
      _hubConnection = new HubConnectionBuilder()
         .WithUrl(_navigationManager.ToAbsoluteUri("http://localhost:5000/usbhub"))
         .WithAutomaticReconnect()
         .Build();

      _hubConnection.On<string>("Connect", serialNumber =>
      {
         _serialNumber = serialNumber;
         StateHasChanged();
      });

      await _hubConnection.StartAsync();

      if (Connected) Console.WriteLine("connection started");
   }
3. Update view to show pushed values
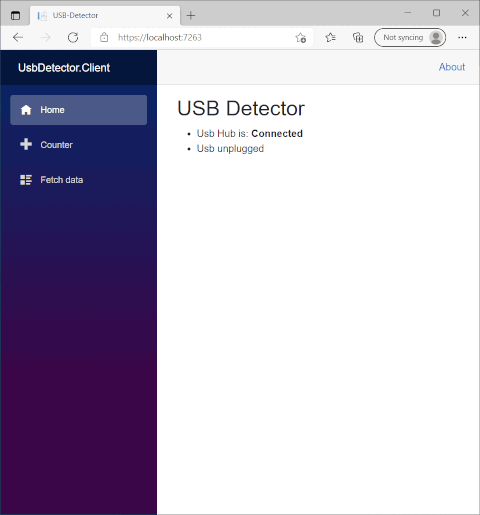
   <PageTitle>USB-Detector</PageTitle>

   <h1>USB Detector</h1>

   <ul>
       <li>
           <span>Usb Hub is: <strong>@(Connected ? "Connected" : "Disconnected")</strong></span>
       </li>
       <li>
           @if (string.IsNullOrEmpty(_serialNumber))
           {
               <span>Usb unplugged</span>
           }
           else
           {
               <span>Usb plugged: <strong>@_serialNumber</strong></span>
           }
       </li>
   </ul>
4. We wait a little bit before run application
Push WASM Client
Now we need to add the code to push the client in worker projects
1. Inject IHubContext<T1, T2> inside UsbDetector class
   private readonly IHubConnection<UsbHub, IUsbHub> _usbHub;

   public UsbDetector(IHubConnection<UsbHub, IUsbHub> usbHub)
   {
      _usbhub = usbHub;
   }
2. Refactor interface IUsbDetector
   public interface IUsbDetector
   {
      Task OnInserted(object sender, EventArrivedEventArgs e);
   }
3. Refactor OnInserted method in UsbDetector class
public async Task OnInserted(object sender, EventArrivedEventArgs e)
   {
      using var searcher = new ManagementObjectSearcher(SearchQuery);
      foreach (var currentObject in searcher.Get())
      {
         var management = new ManagementObject("Win32_PhysicalMedia.Tag='" + currentObject["DeviceID"] + "'");
         var serialNumber = $"{management["SerialNumber"]}";

         await _usbHub.Clients.All.Connect(serialNumber);
      }
   }
4. Now we can run the application but first we have to make an observation, if the worker is not running when client start it will throw an “`exception“` and break. To prevent this behavior we could add a retry policy, let’s follow these last steps before run it
Add Retry Policy
1. Add Polly package
dotnet add package Polly --version 7.2.22. Rename StartHubConnection method into TryOpenSignalRConnection
3. Recreate StartHubConnection method and add the following code
   private async Task StartHubConnection()
   {
      var retryPolicy = Policy
         .Handle<Exception>()
         .WaitAndRetryForeverAsync(_ => TimeSpan.FromSeconds(5), (exception, timeSpan) => Console.WriteLine($"Connection cannot be established"));

      await retryPolicy.ExecuteAsync(async () =>
      {
         Console.WriteLine("Trying to connect to SignalR server");
         await TryOpenSignalRConnection();
      });
   }
4. Now we can run the app in any order. For more information about application boostrap see [Bootstrap](https://github.com/aviezzi/usb-detector/wiki/Bootstrap) wiki section.
Bootstrap Practical Example
This project don’t have a specific starting order, the worst scenario is when client stars first, let us to analyze this case.
RUN CLIENT
This step shows how start client and what browser application page shows.
RUN WORKER
This step shows how start worker and when browser application page is updated.
WEB APPLICATION
This step show how browser application page react when usb stick is plugging/unplugging.
Conclusions
The two solutions discussed in the previous paragraphs have both pros and cons. The solution of using a worker service, which exposes a host through SignalR and a WASM client that connects to it, for the reasons set out in the Strategies Comparison section, is the most dynamic alternative and does not present relevant cons in comparison to the solution with Chrome USB API.
Therefore, for the most varied scenarios, the WASM Client + Worker Service solution is the best solution.
Hoping that this article will be useful to everyone, see you next time.


Alberto Viezzi
Friulano ma vive al confine tra Trieste Udine e Gorizia. Un software engineer appassionato di tennis, di architettura del codice e di C#. Si definisce un Señor Developer. Anzi “true developer” infatti il layout della tastiera è in US.
Last modified: December 11, 2023